Wednesday, September 23, 2015

Modified Chair Yoga: Sun Salutations With a Broken Ankle Version 2

As promised I've got the second version of seated Sun Salutations right here. This series involves the legs but requires little to no weight bearing on the lower extremities. It does, however, get the lower back and core engaged helping to get the blood circulating and muscles working. It can be used as a stand alone practice or done after the first sun salutation series I posted here. The choice is yours...this is your practice. As always, please be sure to check with your own Dr. or PT to ensure your own safety. This is not meant to be a substitute for doctors' orders.

Prep work:
  1. Be sure you've discussed your restrictions and limitations with your doctor or physical therapist. I'm neither of these so I cannot advise you what you're able to do or not do. Don't risk getting re-injured!
  2. Listen to your body! If it hurts don't do it. If a pose isn't already in your wheelhouse and you find it challenging then this is not the time to try to learn it. 
  3. Find a chair or stool that you can comfortably use and allows you some range of motion (armrests are limiting). Depending on how much weight you can put on your injured limb you may need to have your seat higher (or lower) to accommodate that need. Pillows or blankets might be helpful and a yoga mat on the seat can help prevent slipping off of your chair. I used a shower chair which has adjustable legs. This allowed me to raise and lower the seat for different poses and at different stages of healing. Many studios use regular metal folding chairs.
  4. You might find it more comfortable to use a block or book under your "good" foot to even things out.
  5. Although sun salutations are meant to be a warm up I would suggest starting your practice with a few minutes in Savasana, or corpse pose, to connect with your practice and then moving into a few minutes deep yogic breathing or Pranayama. Alternating leg lifts and puppy pose are also a nice warm up addition. You can see these exercises demonstrated here
  6. If your practice allows you might enjoy doing a few rounds of Sun Salutations Version 1 (found here) before starting this version. 
Sun Salutations (version 2):

Starting with arms at the sides take a deep breath in and on an exhale place your hands in anjuli mudra (prayer position).


Inhale arms overhead:


Exhale, press your abdomen toward your spine (imagine your belly button trying to touch your back bone)  and fold forward. Don't fret if you can't reach the ground. Instead, reach for your ankles or shins or even your knees. The idea is to add a stretch (without strain) to the low back and to compress the internal organs.


Inhale and rise up to a "half-lift" by pulling your shoulder blades toward each other, shoulders down. Imagine your chest and neck opening to the sky. Use the chair for leverage, if it feels right, by pushing the seat away and sending the chest forward even more. A slight arch in your back might happen, just be sure not to allow your head to drop back and pinching the neck.


Exhale and bring your right knee up toward your chin grasping your knee. Bring your forward toward your knee. Again, if the range of motion doesn't allow full expression then do what you can. Perhaps your knee will only come waist high and the forehead will be far from touching the knee. It's okay. Just grab the knee at what ever level you can comfortably manage (safety first) and drop your chin to your chest. Do not compromise your safety by forcing your body into a pose.


Inhale and, while still holding the knee in the same position, lift your chin to the sky. Be mindful of your neck and do not allow it to just drop all the way back as this can cause pain.


Exhale and place the right leg back down while folding forward, hands toward the ground.


Inhale to halfway lift:


Exhale and bring the left knee up, grasp it (if possible) and bring your forehead toward your knee. Be mindful of what your body will allow. There should be no strain, no pain, no pinching. You're engaging your core but for the most part this should feel like a release and nice stretch.


Inhale and, while still holding the knee in the same position, lift your chin to the sky. Be mindful of your neck and do not allow it to just drop all the way back as this can cause pain.


Exhale and place the left foot back on the ground and fold forward toward the ground:


Inhale arms back over head, reaching tall through the waist:


Exhale back to anjuli mudra. Repeat this sequence 8-10 times (if possible):


Final Relaxation: A few minutes of Savasana (corpse pose) is the best way to end your practice. It helps connect you to your practice, aid in recovery, decrease blood pressure and heart rate, increase focus and decrease anxiety. Lay on your back in a neutral, comfortable position with your eyes closed...legs about mat width apart and arms away from the body with the palms facing up. If you can, go through a few minutes of tensing and then releasing the muscles of the body starting with the feet, the calves, the thighs and moving all the way up to the top of the head. Relax your internal organs, your forehead, your jaw, your tongue. Relax your mind. Turn your focus on the space between the eyebrows, feel your breath coming in and out of your nostrils. Relax, relax, relax. Stay here as long as you like.


When it's time to get up move slowly. Start by deepening your breath and then stretch your arms overhead, stretching as if you're just waking up in the morning. Roll to one side into a fetal position and rest here just a moment. and then slowly push yourself up to a seated position.

Summary Photo Sequence:


Note: Sun Salutations are meant to flow with the breath. This means that for every inhale and every exhale we are moving to a new position. However, if you find this difficult you may add breaths as necessary. Just try to keep with the flow as best as possible and it will become easier. This is your practice...it's not meant to be perfect, it's only meant to connect you to your true Self.


I hope you enjoyed this photo tutorial.

Namaste.


Thursday, September 17, 2015

Modified Chair Yoga: Sun Salutations With a Broken Ankle

The first few days after I was home from the hospital recovering from surgery and mending a broken ankle I found myself struggling with my new lack of mobility. Granted, I truly was tired, and rest was certainly in order, but my body ached. Nights were restless as I tried to figure out how to lay without creating pressure points and days weren't much better since I had to keep my foot above my shoulders. And while I did get some relief from the few exercise I was initially advised to do it just wasn't enough for me. I needed my blood moving, my lungs expanding and to do some stretches that would counter the position I was forced to be in most of the day.

Talking a few minutes out of the cast to "clean" up the foot. My husband has proven his love for sure!
So I researched chair yoga...and wheel chair yoga...and researched some more. I bought 3 chair yoga books, read them and found that they weren't exactly specific to immobile clients but instead used the chair as a prop. In other words, most of the poses and sequences were for able bodied people who happened to use a chair for balance or to deepen a pose. So I researched some more and found my best results on...Pinterest.

Since I found it difficult to locate what I needed online I thought why not put together a series of blog posts in the hopes someone else might be helped? And here we are!

Get your stretchy pants on and roll out your mat...we're going to do a true variation of Seated Sun Salutations! (The next post will be another variation of Sun Salutations so stay tuned!!)

Prep work:
  1. Be sure you've discussed your restrictions and limitations with your doctor or physical therapist. I'm neither of these so I cannot advise you what you're able to do or not do. Don't risk getting re-injured!
  2. Listen to your body! If it hurts don't do it. If a pose isn't already in your wheelhouse and you find it challenging then this is not the time to try to learn it. 
  3. Find a chair or stool that you can comfortably use and allows you some range of motion (armrests are limiting). Depending on how much weight you can put on your injured limb you may need to have your seat higher (or lower) to accommodate that need. Pillows or blankets might be helpful and a yoga mat on the seat can help prevent slipping off of your chair. I used a shower chair which has adjustable legs. This allowed me to raise and lower the seat for different poses and at different stages of healing. Many studios use regular metal folding chairs.
  4. You might find it more comfortable to use a block or book under your "good" foot to even things out.
  5. Although sun salutations are meant to be a warm up I would suggest starting your practice with a few minutes in Savasana, or corpse pose, to connect with your practice and then moving into a few minutes deep yogic breathing or Pranayama. Alternating leg lifts and puppy pose are also a nice warm up addition. You can see these exercises demonstrated here on my last blog post. 


Sun Salutations (version 1):

Stating with arms at the sides take a deep breath in and on an exhale place your hands in anjuli mudra (prayer position).


On your next inhale sweep your arms overhead keeping your shoulders down (away from your ears).


On your next exhale grasp your left wrist with your right hand and, lifting evenly through both side of the waist, lean to the right. Try not to collapse your right side. Looking up to the left can help maintain an evenness in your sides.


Inhale back to center.


As you exhale  grab your right wrist with your left hand. Lift through the waist and lean left (feeling the stretch in your right side). Again, try not to allow your left side to collapse.


Inhale back to center.


Exhale and sweep your arms down and then forward to a modified chair pose. The upper body will lean forward as if you are attempting to rise from your seat. Arms remain in line with your ears, neck neutral and eyes on a spot a few feet in front of your feet.


Inhale and cactus your arms creating a small back bend. Cactus arms simply means you move your elbows out to the side and inline with your shoulders. You will probably feel a nice stretch on the front part of your shoulders, your lats and upper back. Chin and chest move slightly forward (don't kink your neck) to help emphasis the back bend.


Exhale arms up overhead and return to your upright seated position and then inhale and stretch up tall from the waist.


Exhale and propeller your arms to the right while also twisting your upper body to the right. If possible, grasp your chair to deepen the twist. Try to keep the body upright without collapsing the right side. Keeping your eyes level and looking over the right should will help maintain the posture.


Inhale back to center, stretching up through the waist.


Exhale and propeller your arms to the left while twisting your upper body to the left. If possible, grasp your chair to deepen the twist. Try to keep the body upright without collapsing the left side. Keeping your eyes level and looking over the left should will help maintain the posture.


Inhale back to center. Exhale arms down. Repeat this sequence 8-10 times.


Final Relaxation: A few minutes of Savasana (corpse pose) is the best way to end your practice. It helps connect you to your practice, aid in recovery, decrease blood pressure and heart rate, increase focus and decrease anxiety. Lay on your back in a neutral, comfortable position with your eyes closed...legs about mat width apart and arms away from the body with the palms facing up. If you can, go through a few minutes of tensing and then releasing the muscles of the body starting with the feet, the calves, the thighs and moving all the way up to the top of the head. Relax your internal organs, your forehead, your jaw, your tongue. Relax your mind. Turn your focus on the space between the eyebrows, feel your breath coming in and out of your nostrils. Relax, relax, relax. Stay here as long as you like.


When it's time to get up move slowly. Start by deepening your breath and then stretch your arms overhead, stretching as if you're just waking up in the morning. Roll to one side into a fetal position and rest here just a moment. and then slowly push yourself up to a seated position. 

Summary photo sequence:


Note: Sun Salutations are meant to flow with the breath. This means that for every inhale and every exhale we are moving to a new position. However, if you find this difficult you may add breaths as necessary. Just try to keep with the flow as best as possible and it will become easier. This is your practice...it's not meant to be perfect, it's only meant to connect you to your true Self.

I hope you enjoyed this photo tutorial.

Namaste.

Saturday, September 12, 2015

How Yoga is Helping Me Heal My Broken Ankle

It's a funny thing the thoughts that run through your head when sitting on the side of a trail with a broken ankle. Besides wondering how I was going to get off the mountain and to a hospital I also questioned how I would ever trust my body again. I imagined myself relegated to flat sidewalks, avoiding dangerous curbs and, of course, never hiking again. And while I'm currently several weeks from taking the cast off I still have doubts about my recovery...specifically, will I get my full range of motion back?


Yoga is a huge part of my life. I embrace it not only physically but also spiritually and emotionally. Or at least I try. The yogic principles set the tone for my daily living and I honestly think this, combined with my meditation practice, got me through the accident and rescue with pretty much no pain or panic (it was actually a surprisingly magical experience). It was important to me to continue my yoga practice even with a broken ankle. Obviously, I have many physical limitations so asana (or poses) can be a bit of a challenge but yoga has so much more to offer through the eight-fold path. However, the physical aspects of a yoga practice are a living, breathing part of our being, meaning they can be modified in ways to support our bodies regardless of our physical limitation. .

I wanted to share some of the ways I've kept my yoga practice central to my life while I recover mentally and physically.


My husband did so well feeding me while I was unable to cook for myself. This is the black bean burger and chop salad he served me for lunch the other day.
 1) Right Eating {Ahiṃsā/Mitāhāra}: For me this means vegan (or at least vegetarian) foods. I had allowed myself many "slips" during our visit to Alaska (prior to the accident) but
once I realized the work my body had to do in order to heal I cleaned up my eating. My meals consist of fresh fruits and veggies (organic when at all possible), organic oatmeal and granola, plant-based protein powder (a supplement I opted for since I couldn't cook for myself early on), whole grains and legumes along with plenty of water and herbal teas (and no alcohol). I also started taking Biotin, a Calcium/Magnesium/Zinc supplement, large doses of Vitamin C, Symphytum Officinale (aka Bone Knitter) and occasional shots of aloe vera gel. I want the best fuel I can get so my body will have the building blocks it needs. Hopefully it's helping.


2) Meditation:  My meditation practice was a work-in-progress prior to the accident but being laid up has given me the opportunity to recommit and refocus. I learned meditation years ago during a visit to the Siddha Yoga Ashram in Oakland, California. I practiced off and on (mostly off) for many years until I went to yoga teacher training at the Sivananda Ashram Yoga Farm in Grass Valley, California last year where I lived for a month. Twice a day we meditated for 30 minutes and I've done a semi-decent job of sitting once a day...about 50% of the time. Being incapacitated has certainly freed up my time and reminded me that meditation is a required component in my life. It's kept me from dipping into depression while being cooped up inside the RV day in and day out.

Learning from author Peter Russell at yoga school.
After my accident I came across Peter Russell's How to Meditate Without Even Trying program on Facebook. Peter was one of my favorite guest speakers while at yoga school so I joined his course. I also received a copy of Dr. Radhule Weininger's Entering the Deeper Stream from a dear friend. Needless to say, there's no shortage of meditation material...and no excuses!

My finds after a visit to the used book store, Mountain Eagle, in British Columbia.
3) Reading Positive/Spiritual Material {Svādhyāya}: I love to read. I can wrap myself between the covers of a book and be lost for hours. But I can also allow myself to be affected by what I'm reading...much like how one's mood can change after watching the news or a sad movie. Reading is a great escape but every once in a while I find myself grumpy or perturbed for "no reason" but when I sit and think about it my mood sometimes reflects the books I've been reading. While I've been recovering I've made it a point to read some of the recommended yoga and meditation books I keep hearing about from fellow yogis and writers.

I'm certainly not going give up reading the variety of books I normally enjoy, even if they do affect my mood in a slightly negative way, but I am more focused on giving my mind and body all the positive vibes I can right now. Here are some of the books I've been reading: Wherever You Go There You Are (Jon Kabat-Zinn), Yoga Beyond Belief (Ganga White), SunLight Chair Yoga: Yoga For Everyone! (Stacy Dooreck), No Man Is An Island (Thomas Merton), Teaching Yoga Essential Foundations and Techniques (Mark Stephens), Grace (Eventually): Thoughts on Faith (Anne Lamont), Police (Jo Nesbo)...yes, a little fiction is sometimes in order.


4) Pranayama: Breath work is one of the pillars of yoga. It's also the one I dislike the most. Maybe it's because I often feel like I'm sitting there gasping for breath. Or maybe it's because sometimes it's really hard to breathe, count, hold, and remember which nostril I'm supposed to breath out of next. But prana is our vital life force and exercising our breath can be nothing but beneficial. Pranayama prepares us mentally for our other practices by concentrating our focus and awakening our soul. Trust me, I have some weird aversion to pranayama and sometimes "cop out" by only practicing deep yogic breathing but the key is to keep on keeping on. Practice other forms of breath work (some will likely require guidance...maybe through a yoga teacher, ashram or perhaps a respected online instructor...check out these pranayama specific videos at Grokker.com (free), yogadownload.com ($29 annual membership with Groupon) or doyogawithme.com (free)) and you will reap it's benefits. After surgery I was given an incentive spirometer to help clear my lungs and to prevent fluid build up since I'd be on my back for weeks. It reminded me of my (neglected) pranayama practice and just how important it really is not just for healing, but for life itself.


5) Asana: Most of us are somewhat familiar with yoga modifications. After all, not everyone can touch their toes or perform hanumanasana (the splits) so we use props, perhaps a strap, block or blanket, to help us deepen our poses while preventing injuries. Well, this injury has certainly tested my creativity and ability to find modifications that are "doctor approved". For the first two weeks I couldn't do much due to the severity of the fractures, surgical incisions that needed to mend and cast blisters that I didn't want to tear. I was on strict orders to not bear any weight on my right leg. But I was fortunate in that the physical therapist who saw me before I was discharged showed me a few safe exercises I could do without much pain. I asked about incorporating a few yoga poses, which I showed her, and got the green light. Over the next few weeks, as my blisters healed and the bones mended, I was able to do more poses, always listening to my body and embracing its limitations.

Here are the exercises I was given by my physical therapist. I was encourage to do these daily two days after surgery:

The first thing she showed me was how to lay on my stomach. After 3 days of being fairly immobile, flat on my back, it was such a relief to change positions. I could stretch my front body and release the tension built up in my lower back. Initially I was only able to do this on a bed (or platform) where my toes could hang over the edge. I soon started using my foam roller to support my leg so I wouldn't be putting any weight on my toes (causing pain).

Sphinx Pose: Great for opening the shoulders and chest while stretching the spine.
Low Cobra (Bhujangasana) with foam roller support. You can also do this on bed on on a platform with the toes hanging over the edge. The foam roller actually changes the body alignment (not necessarily for the good) and causes the back bend to be deeper, which may not be ideal. Using the back muscles, as opposed to pushing up with the arms, strengthens the back.
Full Cobra. Same principles as above with a deepening of the back bend and full front body stretch.
Alternating Leg Lifts. I was encouraged to start these exercises almost immediately. Lifting up on an exhale to the count of three and lowering on an inhale to the count of three. I also do double leg lifts keeping the small of my back pressed into the mat for protection.
Side Leg Lifts. Leg lifts of all sorts (done correctly with slow, controlled movement) helps strengthen the muscles needed to maneuver around on crutches. You'll be relying on just one leg for getting out of chairs or on and off the toilet so that leg needs to be strong. But you also want to exercise the other leg (as much as allowed). That cast is heavy and takes a toll on the body just to lug it around. Keeping what muscles you are able to use toned will help with recovery once the cast comes off.
Extended Puppy Pose (Uttana Shishosana). A safer pose than down dog (since I can only use one leg) extended puppy pose is a great way to stretch the spine and shoulders.

Seated Forward Bend (Paschmottanasana) is a great way to stretch the hamstrings, spine and shoulders. It also stimulates internal organs and can aid in digestion (great for people who are bed-ridden) while relieving stress and calming the mind.
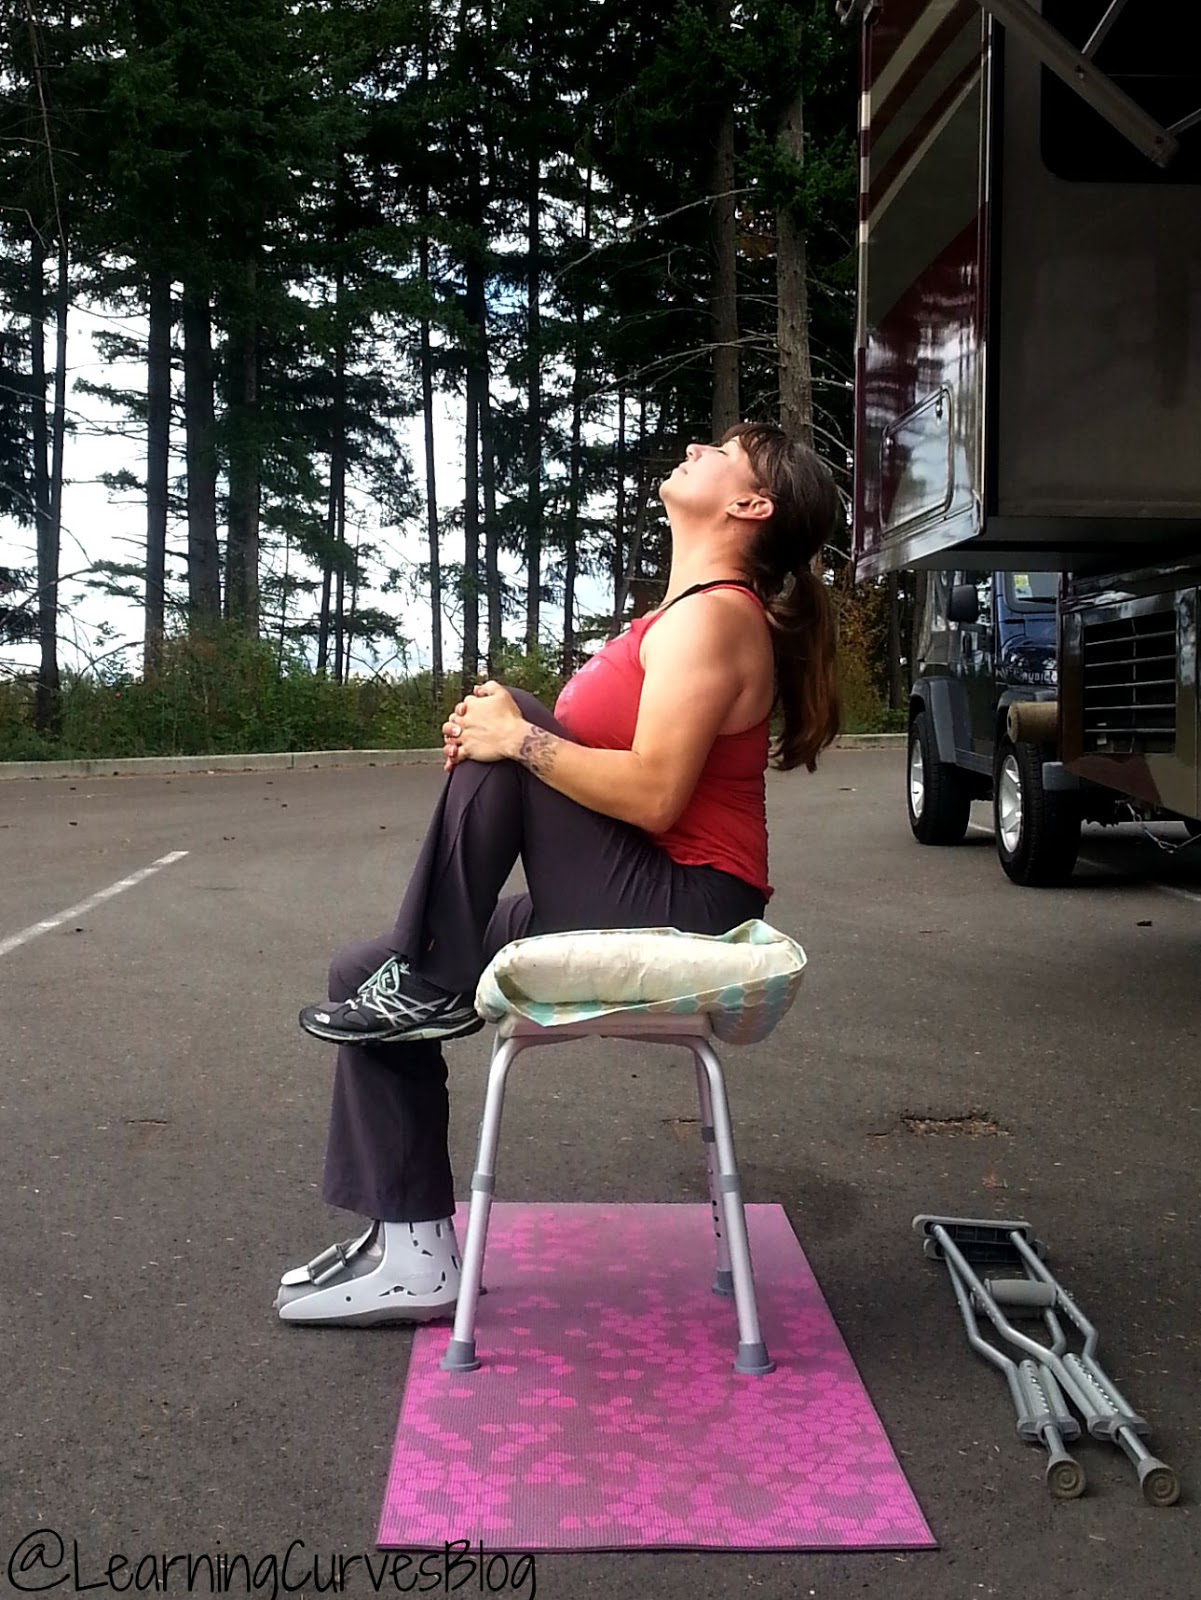
Seated Spinal Twist (modified with stool). If you can't bear any weight on your injured leg raise the height of your stool or sit on the edge of your bed, legs dangling. Try to keep the hips and knees even and facing forward while you twist the upper body (from the waist up) to either side. Move slowly. With an inhale stretch up and lengthen through the sides and with an exhale twist, keeping that length you just created. Hold and breathe several breaths...lengthening on the inhales and twisting deeper on the exhales. Be sure to twist to both sides. Twists aid in digestion, stimulate internal organs, relieve muscle tension in the back, neck, and hips and can even help alleviate sciatic pain.
Corpse Pose (Savasana): It's strange how laying perfectly flat on the ground can feel soooo good after laying around all day on the couch with your leg elevated. The benefits of savasana are numerous and include lowered blood pressure, stress relief, relaxation and a grounding feeling that can help with connecting to the self.
I'll soon be adding new blog posts with more Modified Yoga poses including seated Sun Salutations. It's my sincere desire to help anyone else who is facing similar challenges and seeking to overcome their fears and maintain a practice. Yoga truly is for every body...


Further reading on Yoga in Daily Life by Sri Swami Sivananda

Related Posts Plugin for WordPress, Blogger...